Anatomy of a photo #58: Song Sparrow perched on grass


Nature amazes me sometimes. How a bird can be supported so easily by the grasses that we think of as so weak...

I have better, higher definition photographs of many birds, including song sparrows, but it isn’t always about having high detail in nature photographs. Sometimes, the story told by an image that zooms out a little, takes in more of the environment can say much more about the subject.

A close up image, where I can see all of the detail in a birds feathers says little about the bird’s size and habits. This image however, of a sparrow clutching a few strands of grass tells the viewer that this bird is small and light. It shows scale against the grasses, but also shows how they are able to support it. It also shows where this sparrow is comfortable, what part of its habitat is, possibly even where some of its food may come from.

The composition of this photo is also pleasing. The tops of the grasses are visible (for the most part. Nothing is really centered in the image. The sparrow is down and to the side. The grasses criss cross while stretching towards the top of the frame. The shallow depth of field grabs and focuses just on the bird and and a narrow row of grass, everything else that is not important blurred away from our consciousness. A simple image with little distraction.

ISO 200, 420mm, f/5.6, 1/800th second

Posted in Anatomy of a photo, birds, nature photography, photography, portraits, SLR, wildlife photography | Tagged , , , , , , | Leave a comment

Anatomy of a photo #57: Marbled Godwit in the sun’s first light


The low angle of the rising sun can give beautiful natural lighting

The Marbled Godwit (Limosa fedoa) is one of my favorite shorebirds, for the simple reason that it was one of the first ones that I learned to identify. Its mottled cinnamon coloration coupled with its long slightly, upturned beak that that becomes black towards the tip, made it distinctive to me, especially as I mostly saw it in the company of willets, where it was a striking contrast. This godwit is one of the largest sandpipers we have in our area, and can often be seen in mudflats or running up and down the line of breaking waves, plunging its bill, deep into the ground as it probes for invertebrates and other tidbits.

This particular Marbled Godwit I came across early one morning while on a kayak photography outing. The early morning sun kissed it so nicely as it walked along its own narrow stretch of beach, modeling so perfectly for me with the natural lighting, just a hint of shadow at its back that I couldn’t resist taking a few photos as I drifted gently by, staying still so as not to spook it.

To complement the sandpipers long legs and neck, I turned my camera on its side to give the photograph a vertical orientation (that, and it’s so tall at this range that it wouldn’t have fit in the frame in landscape orientation). I kept the subject on the left side of the image so that it was facing toward the open space of the photograph (not so good if the birds face is up against the border of the image with, with lots of empty space behind. Poor flow.)

I used a long lens. I had a wide open aperture and low ISO so that I could get the most out of my shutter speed without having to worry about noise or blur from the quick movements of these lively birds. The shallow aperture also gave me a very shallow depth of speed.

And then a little action, as simple as walking can change the image rather quickly

Posted in Anatomy of a photo, birds, kayak photography, nature photography, photography, wildlife photography | Tagged , , , , , , , , , | Leave a comment

Anatomy of a photo #56: Portrait of an old cowboy


This is a portrait of a cowboy. Don't let the clothes fool you, look at the man

This is Donald “Red” Rightsell. He was raised in the once small town of Patterson, California. He started roping in rodeos and jackpots when he was 18, and hasn’t stopped in over 65 years. At the young age of 70 he won two saddles and over $3,000 in prize money in a single day. He won himself a saddle and a buckle as recently 2009. As a friend of mine says, “He’s one in a million.”

I took this photograph at a friend’s ranch, where they were doing a little practice. He had thirty years on anyone else that was there, but he still had a thing or two to show them. Others missed, he didn’t. Even though he wears a baseball cap and a t-shirt, Red is every inch the cowboy, knowing what the cow might do before it does itself. He is one with his horse, guiding it with the familiarity of a lifetime.

When I snapped this shot, it was towards the end of a late summer’s day. The sun was low, giving everything a nice warm color. It wasn’t too bright, allowing me to expose for the rich shadows with out burning out too much of the photo where the sun was hitting. The low angle of the sun allows it to accent the picture without dominating it.

I caught Red in a contemplative moment as he and others sat their horses, enjoying the moment, the young energy of the horse contrasting the firm hand of the experienced rider, with history written in his every line. I was able to capture him in this quite moment with one of the longer lenses that I use for wildlife. I was faded away into the background. I wasn’t part of the moment that these people were sharing, I was just an observer from outside of their time, not a part of their consciousness.

The shallow aperture of my lens blurs the background enough so that it hints at farm equipment and machinery, without distracting from Red the principal players- Red, his horse, and the ears of another horse, that show they are not alone.

Live hard, experience life, and enjoy those quiet moments.

ISO 500, 420mm lens, f/7.1, 1/400th second

Posted in Anatomy of a photo, documentary, photography, portraits, SLR | Tagged , , , , , | 1 Comment

The why of kayaking with your camera


Cypress Grove late afternoon

Recently I addressed some of the issues people new to kayak photography should think about, without realizing that I never said “why” people should kayak with their cameras in the first place. So today, I will talk a little about why I started taking my camera out with me, and about some of the pleasant surprises that awaited me (i.e. why I keep taking my camera out into watery danger.) Maybe they will inspire you to try a new style.

Cypress Grove pre-sunrise

I live alongside this amazing natural feature called Tomales Bay. Twelve miles of semi-tamed Pacific Ocean, with rolling, grass covered hills on one side, and rugged national seashore on the other (there’s a lot more to each side, but I am trying to keep this somewhat brief.) On the side with most of the grassy hills, a road runs about two-thirds of the length, often times fairly close to the shore. There are nice turnouts along the length of it, offering some beautiful shooting opportunities.

Cypress Grove at Sunset

Cypress Grove at Sunset

It’s fantastic… except that the turnouts and shore always offer the same views, the same angles. Sure, the light is different each day (as demonstrated by the first three pictures on the right,) and the sky and the clouds were always changing, but I was taking many pictures of the same scenes. I was starting to get frustrated that there was this amazing place, and I could only capture a small percentage of it. I began to hunger for a way to see more, get different angles. I needed a way to get away from the road and the shore so that I could have different perspectives. I started having dreams of a miniature personal blimp (which I still dream about,) of motorboats and sailboats… and finally I thought of a kayak, without ever realizing how perfect it would be for nature photography.

It didn’t always seem perfect at first, but as I got more comfortable being on the water, and started thinking less about the possible mishaps, I became more impressed by the pictures I was bringing home. I started to understand the potential, and the inherent advantages.

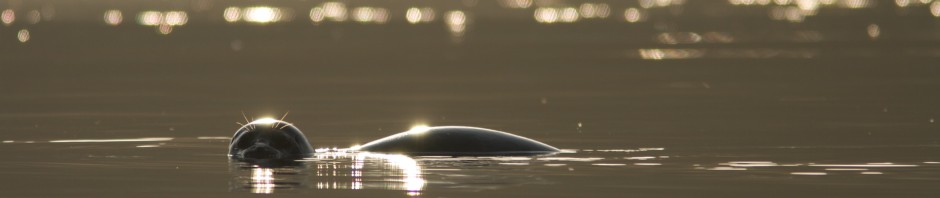
When you are in a kayak, you are down low, only two or three feet off the surface of the water, you’re entire perspective has changed. You are at, or just above the eye level of many birds and marine mammals. For landscapes, this same angle gives you a nearby foreground that gives perspective to the images. You don’t have to crouch down to get this picture plane, you automatically have it. Kayak = knee level point of view, but with photogenic water stretching away.

pickleweed

Even better, you get to drift. No moving your body in ways that will frighten wildlife. Breezes can push you. You can get moved along by the current. If you are on calm unmoving water, you can get up speed, point yourself in the direction you want to go, and your momentum will carry you for a good ways, gliding quietly along.

It’s quiet. No motor to scare wildlife away. The sounds of the kayak are similar to waves lapping the shore, or of fish and other animals swimming.

There are more reasons why kayaking and cameras can go well together, but this is only my second post, so I have to save something for later. In the meantime, go out and try something new, get a different perspective.

-Galen

Least Sandpiper stalking the shores

This is a repost of an article I wrote several months ago

Posted in birds, kayak photography, landscapes, marine life, nature photography, SLR, wildlife photography | Tagged , , , , , | Leave a comment

Focusing on Portraits: Animals and otherwise


Portraits of animals are more than simply pictures of animals. They engage the audience.

A portrait tries, with a single snapshot in time, to tell a story. This is true, whether the image is of an old ranch hand, a cow, or a wild animal. Usually this will be a tightly focused image, where the subject has a large, strong presence in the frame.

Notice how the focus is all on this man and the clam he’s holding in his hands. The background is just seen enough to tell you that he is at the water.

A portrait is not all of the details of a life or event, it is a moment when you’ve grabbed onto the essence of someone or something. It creates and captures a thought, a feeling. It can be a whole image or a zoomed in, focused down part. Usually the face, the head, the eyes play a strong role, because this is where we look for thought, expression. This is the part that speaks most to us, the part that connects us.

The focus in this picture is on the eyes, and those eyes are engaging the viewer

Focus in on the eyes. Make them clear and sharp, bring them out in the portrait. Try to arrange the image so that you can see light reflected in the eye. Position yourself in relation to them so that there is some natural light there. Watch them, so that if they shift their head a little, move their eyes a little, you will be ready when something flashes in there. You can always use a flash to get that light in the eye. It can be photoshopped in after, but it’s better, more honest to the subject of the picture if that light was really there.

Engage the person you are photographing in a conversation about what is important to them. If they are speaking about things that matter to them, it will animate them, give them expression.

This Yellow-billed Loon knows I am there, but I am not threatening it. We are engaged with each other, we’ve established an understanding of sorts

If you are taking a picture of a wild animal, engage that animal, by discreetly, and non-threateningly letting it know that you are there. Let it see a little bit of movement, but a movement that is not directed toward the animal, but that shows your attention is focused somewhere else.

Blur out the back ground, or have a neutral background, UNLESS that back ground is part of the story- cowboy with a horse or saddle, or an old woman with a quilt she sewed. Don’t let the background take over the subject though. Keep your focus, and direct your audiences attention. To blur the background, either use a very fast lens, or a longer lens so that you have a shallower depth of field. Keep the aperture open, instead of stopping it down. The shallower the depth of field, the more you can direct the observers attention to your points of focus.

This clam has no face, no expression of its own really, but using depth of field I’ve focused the audiences attention so firmly on it, that it becomes a portrait

Play around, have fun. Find how to take a picture of a person or animal in a way that speaks to you, and it will likely speak to other people.

There is no eye contact, but a story is being told, one that we all know. Using focus and depth of field, I’ve played around to turn what is an unsavory task, into a well composed, story and portrait

This is a repost of a blog originally written on April 11, 2011

Posted in How To, nature photography, photography, portraits, wildlife photography | Tagged , , , , , | 1 Comment

The Yellow-billed Loon: An Essay in Photos


This slideshow requires JavaScript.

This is a rare bird in the area where I live, but occasionally we have one that will stop and spend a summer. This is a younger bird, but it seemed to feed well here in our coastal waters. I .took all of these photographs from my kayak, which can be a marvelous platform for photography

If there is an image that you would like to know the making of, or to see in more detail, ask, and I can include it in a future post

Enjoy the photographs.

Yellow-billed Loon snapping water with its beak

Yellow-billed Loon beating water from its wings while grooming

Yellow billed Loon shaking off water and beating its wings

Notice the water droplets as it gives a good shake?

So much fun to watch these birds go through their daily rituals of bathing

I love the color of the Yellow Billed Loons eyes

Posted in birds, kayak photography, marine life, nature photography, photography, wildlife photography | Tagged , , , , , , , , | Leave a comment

Anatomy of a photo #55: The Red-throated Loon rises


Red-throated loon rising from the water to beat droplets from its wings

It was a grey and foggy day. Not so distant shores were hidden by the thick, low lying vapors. The birds were thick, as the winter migrants were making their presence known on the bay, and settled in for the season.

I was busy photographing a Yellow-billed Loon, which is a rare bird in our area, sometimes with years between sightings. (There will be some photos in a post very soon) I was not so busy with the yellow-bill however, that I would neglect one of its more common cousins, a Red-throated Loon, especially as it began rising up to beat water from its wings, providing a little drama to a grey scene.

Loons, along with many other waterfowl, such as grebes, geese, murres, cormorants, and more will rise up from the water like this and beat their wings. It is often done prior to taking off (to shed some water and some weight), or while they are preening and grooming (which can also involve removing water, or just snapping groomed feathers back into place).

This is one of my favorite times to photograph waterfowl. The wings are spread, and can be in interesting positions or angles. Much of the body is visible. It is a behavior just far enough from the norm to capture the viewers interest, while being common enough that the photographer doesn’t have to wait for days to see it happen.

I took this photograph from my kayak with a 300mm lens on my digital SLR. I hand held the camera, as tripods can be counter productive on a boat. The lens was image stabilizing or vibration reducing, depending on your terminology. This gave me two extra full stops of play in the lower light of the overcast day, allowing me a fast enough shutter speed to compensate for lens shake.

The fairly wide open aperture gave the background scene of pelicans a nice blurriness, such that they only hint at what they are, leaving the audiences attention focused on the loon, which while centered from side to side is at the bottom of the frame for a better flow.

Here are some images I took of this same loon, but in these photos it is a Walking Loon

Posted in Anatomy of a photo, birds, kayak photography, loons, nature photography, photography, wildlife photography | Tagged , , , , , , | 5 Comments

Anatomy of a photo #54: Rainbow on the beach


Rainbows are (fairly) easy to move, so try to have your rainbow coming out of, or arching over something of interest

In the picture above I was at Matapauri Bay in New Zealand, walking along a short trail that cut through two small hills near the beach. A sudden down pour  forced me to stow my camera (a.k.a. cellphone) in a plastic bag I had brought with me in case of such an eventuality. Drenched, my companion and I were walking the short trail, when I saw a break in the clouds and the beginning of a rainbow. It was coming out of the hill next to us, and did not make a very good photograph. Most of it wasn’t even visible, because the hill was too close. I turned on the afterburners and ran for the beach.

As I ran, the view opened up, water and sand became visible, and the rainbow? Well it followed me right along, just like a faithful dog. Rainbows are pretty magical that way. There were a few houses visible on the far shore, so I moved far enough so that most of them were hidden by the large rock on the left or behind the hillside on the right. I placed myself so that the rainbow was coming out of the rock, and took two photos before the rainbow faded away too much to photograph anymore.

One of the fabulous things about rainbows is that if you move, they move, and so to a certain degree you can push them around (or pull them around) to work with your photographs composition. If you see a rainbow, and it’s not in a very photogenic location, you at least have a chance of placing it somewhere better. It’s a risky proposition, as rainbows can be a little finicky, and can disappear just as quickly as they show up, but it is at least worth the effort.

Rainbows are an optical effect, and is dependent upon the viewer for its existence. If I am standing next to someone, and we are both admiring a rainbow in the distance, we are actually admiring two different rainbows… They just appear the same. Rainbows are created by the sunlight reflecting off of hundreds, thousands, or even millions of water droplets (how many depends on the scale of your rainbow, whether it is from the water hose, a waterfall, or a rain storm). Your rainbow will always be in a straight line from the sun, through your optic center (a.k.a. your eyes) and out the other side, at a spread of 56 degrees from the centerline… In other words, with the sun at your back the rainbow will always be straight in front of you. (For more on this read my post Where to find your best light and rainbows.)

Posted in Anatomy of a photo, How To, landscapes, nature photography, New Zealand, photography, weather | Tagged , , , , , , , , | Leave a comment

Anatomy of a photo #53: Osprey and fish


Osprey flying by me with a fish

I was out kayaking one day when I saw an osprey on the rocky shores of Tomales Bay feeding on a decently sized fish. I got up a little speed while still a distance away so that I would have enough momentum to drift closer without having to scare the osprey off by using my paddle.

As I was drifting closer, a vulture clumsily landed a five or six feet fro where the osprey was tearing off bites of fish.

The osprey repositioned itself towards the vulture, mantling slightly over its prey, before tearing off another bite.

The vulture took a couple small steps closer. (It’s hard for a turkey vulture to take large steps. Short legs.) encroaching a little on the osprey’s comfort zone.

The seahawk picked up the fish with one scaled talon and began shaking the fish at the vulture, almost as though it was trying to say, “It’s still moving, it’s alive. You don’t want any of this, your a vulture. You like dead things. It’s alive, so leave me alone to eat in piece.”

The vulture wasn’t buying though. It moved closer, raising it’s wings a little, possibly to catch its balance, possibly to be a little larger and a little more intimidating. The osprey raised its wings back.

They stared at each other. A step closer by the vulture. And the osprey had enough. Grabbing its prey, it took off from the shore, the fish trailing from its talons and dipping in the water. It flew nearly straight towards me.

Of course I obliged and took its picture. I had been photographing the entire exchange on the shore, watching as it all played out. The photographs of the osprey carrying the fish, however are the most dramatic, and so the one I am sharing with you today.

I took this photograph from my kayak, using a 300mm lens. The settings largely followed the recommendations of my cameras built in light meter.


For an images of an osprey catching a fish, you can check out this post- Osprey’s catch of the day

Posted in Anatomy of a photo, birds, kayak photography, marine life, nature photography, photography, SLR, wildlife photography | Tagged , , , , , , | Leave a comment

Finding scale in New Zealand


This slideshow requires JavaScript.

So often when taking photographs, we see something amazing, raise our cameras, take the shot, and walk away very pleased with ourselves. Until we get home and review our pictures. We were so impressed with how much larger or smaller than normal something was, that we just wanted to capture it so we could share it, but we forgot one very important thing… to give our photos scale. Taking a photograph of the largest ball of string in the world means absolutely nothing, if you can’t tell that it is really, really big.

When you photograph something because it is especially large or especially small, it is important to include something in the photograph to give the viewer a sense of the scale of the object. (I addressed this partially in an earlier post on the lava tubes of Lava Beds National Monument.) On a recent trip to New Zealand I came across several objects (animal, mineral, and vegetable) that gave me reason to include people and/or objects in my photos to give a sense of scale. These were subjects that were either especially large or especially small, but needed visual cues to help the viewer of the photograph to realize which.

A starfish. How exciting.

Aha! A star fish with a foot. Suddenly the audience realizes that this is a very small starfish, smaller than what they may be used to. If they realized how small my model's foot really is, they'd know that this guy is miniscule

Posted in documentary, How To, How To, marine life, nature photography, New Zealand, photography, SLR | Tagged , , , , , , , , | 6 Comments

Intro to aperture, shutter speed and ISO: Part I Aperture


There are three main factors within your camera that affect the proper exposure of your photographs. They are the aperture (how much light you let pass through the lens at any given moment), the shutter speed (how long you let light pass through your lens), and the ISO (the sensitivity to light of your film or digital sensor). If you are set to the proper exposure and decide to change one of them, to then keep your exposure correct, means you have to change one of the others (or even both) to compensate. Each one, when changed, affects a different aspect of the final image in unique yet important ways.

Aperture Value

Aperture, or f-stop, is not only how much light you are allowing into your camera at a given instant, it also directly affects your depth of field. A smaller aperture number (i.e. 2.8 versus 22) means more light is reaching the cameras exposure element (either film or digital sensor) and that there is a shallower depth of field. A higher aperture number (16 versus 4.0) means that your aperture is stopped down and less light is reaching your exposure element. However, you will have a much deeper depth of field.

Around this time, if you are newer to cameras, or at least to the manual settings of cameras, you might be starting to wonder what it is I mean by “depth of field.” Depth of field could almost be better stated if it was called “distance or depth of focus,” because it refers to how well objects at different distances from the camera are focused in the same photograph.

At smaller aperture numbers, such as f/1.4, f/2.8, f/4.0, or f/5.6 objects are in focus only if they are very close to each other or in the same plane. Sometimes, if you are very close to two objects, one of them could be in focus and the other one not, even if one was only an inch farther away. Crank down your aperture to one of the bigger numbers like f/22, and an object twenty feet away could be just as well focused as one fifty feet away in the same image. (This will also partly depend on lens length, but that will be a different lesson.) In short, as the aperture changes to allow more or less light through the lens, it also affects how much of what the camera is seeing is actually in focus.

The aperture on this lens is set for f/2.8 It is almost fully open, and so lots of light can pass through

The aperture has now been stopped down to f/8.0 The higher the number, the smaller the opening, and less light passes through

The aperture on this lens is now cranked all the way down to f/22. Notice how small the opening is. Very little light is passing through, however, the depth of field will be greater and objects at different distances will be in focus

As the aperture changes, the amount of light reaching your film or sensor changes. If you stop down the aperture to f/22, you are cutting down the amount of light. To compensate, you need to either increase your exposure time or increase the sensitivity of your film or sensor. For example, say you have a proper exposure when your aperture is set to f/8, shutter speed is 1/250 of a second, and ISO is 400. If you then adjust your camera by one full f-stop (aperture setting) to f/11, you would then need to adjust either your shutter speed (one full stop to 1/125) or your ISO by one setting (to ISO 800) to compensate your loss of light and maintain the proper exposure. Many cameras change their settings by half or 1/3 stops, but the numbers I am giving are for full. Adjust your settings accordingly.

If you have any questions or feel a point needs clarifying, feel free to ask questions. Next in the series will be a more detailed explanation of shutter speed.

Happy shooting

Posted in How To, photography, SLR | Tagged , , , , | Leave a comment

The North American River Otter: An extensive essay in photos


This slideshow requires JavaScript.

This post celebrates the North American River Otter. While somewhat misnamed (they are found on lakes, ponds, rivers, open ocean, in swamps, bogs, marshes, wetlands, and more. They are one of the more common mammals that I come across while on kayak photography outings in my local bays and estuaries. (Harbor seals are the most common.)

I have coma across them singly and in groups. Playing, eating, grooming. They are an active communal animal that is always a pleasure to come across and watch, but ideally at a distance where  don’t disturb them from their natural habits.

I hope you enjoy these images, and please, let me know which are your favorites, or which photos you would like me to write about or include in my anatomy of a photo series.

For more otter images, or for details on some of the pictures, you can visit my post about a trio of river otters or my description on how I photographed and filmed a river otter eating a large fish.

Enjoy,

Galen

A family of otters. Notice the small young one in the middle?

Otter emerging from the water with a sculpin fish in its mouth

This is a still image I took while videoing this wild otter eating

Here is the video of this River Otter devouring a large fish. The sound cuts out part way through, so you only hear the crunchings of the fish for a while. It is the footage and the detail that are the most fun however.

An otter arching as it dives into the water

A somewhat demure otter

Posted in kayak photography, marine life, nature photography, otters, photography, wildlife photography | Tagged , , , , , , , | 6 Comments