Anatomy of a photo #25: Male Elephant Seal


The males use the fleshy nose appendage to help in their raucous calling

I’ve worked with the nearby national seashore for years now, supplying them with images and documenting different projects around the park. Sometimes the park lets me take part in things like the elephant seal count. When this happens, I am actually assisting in the count, but making use of my photographic equipment and talents to help- taking pictures of flipper tags and then zooming in to read the markings, for example.

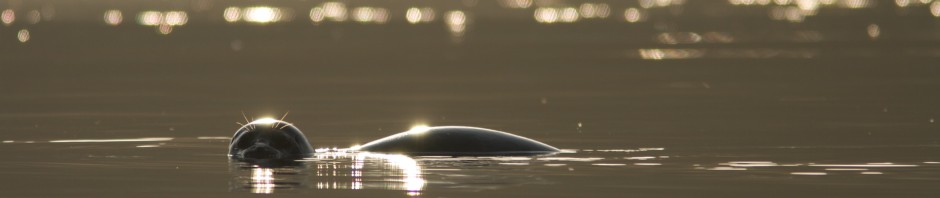
The picture above is of one of the bull elephant seals. Below I speak about them a little, and give some information on why we can see them in this northern California area, but only during certain times of the year.

This picture was taken using a long lens. While it may be possible to approach an elephant seal, it can also be very dangerous, so I try to keep my distance a little, especially when I am distracted by looking through my lens. I was actually slightly up on a hillside when taking this picture, in a spot where the elephant seals didn’t really have access to me.

The telephoto lens helps to compact things, bring them closer together at times, by keeping distant objects at their relative sizes. If I had taken this picture with a wider lens (and therefore been closer to get the subject bull at this size in the frame of the photograph) the second elephant seal would have been pushed farther away by the perspective the shorter lens gave. Shorter lenses stretch perspective (as does being zoomed out) while longer lenses compress perspective (as does being zoomed in) making objects at times appear closer together.

I was a little above the bull elephant seal when I took this photograph, but I was down as low as I could be, to get more of a side on perspective. I often dislike taking pictures from too far above somethings head, as the angle feels funny and you get a less portrait like result (of course there are exceptions to every rule), so I tried to be as side on for this picture as I could.

I used a fairly shallow depth of field, this way one male is out of focus, the other in focus, drawing the eyes of the viewer much more strongly.

And now for the natural history-

The breeding season for northern elephant seals begins in early winter and extends to early spring, with adults spending the entire cycle—up to three months for males, one month for female— on shore living off their blubber. Starting around November or December, males arrive and begin to vie for dominance. Heaving around bulks of up to 5,000 pounds and “trumpeting” with the help of sounding chambers in their gigantic noses, they engage in what can be bloody and brutal battle. A dominant “alpha” bull will lay claim to an area where the females will gather.

In December and January, pregnant females arrive. They occupy chosen areas above the high tides, in groups of up to several dozen with an “alpha” bull in their midst (second-rank bulls may hold forth on the perimeters). Each female gives birth to a single pup, then protects it for four weeks and transfers 200 to 300 pounds of body weight to her offspring through rich, fatty milk. When the time nears for the young to wean, the female breeds again in order to bear another pup a year later.

Throughout this seasonal cycle, there are scientists observing the colony. They record all the meaningful dates, count the adults and young, and tag the year’s pups as they are weaned. With special permission to approach these federally protected marine mammals, and with specialized skills and sensitivity, biologists

place tags in some of the seals’ flippers, scarcely bothering the animals. Monitoring known individuals in this way yields highly valuable scientific information: how many seals born here will return in subsequent years, which ones move to other colonies, and in some cases where they may show up throughout the North Pacific.

While it is marvelous to watch all the seals’ activity, park visitors must take care to avoid harm—to the seals and to themselves! Not only is it against federal law to disturb marine mammals, it can be dangerous for people and their pets to approach them. While it’s hard to imagine such big hulking creatures posing much of a problem on land, they actually move very quickly over short distances. Unlike other marine mammals that retreat into the water when approached, elephant seal bulls will chase and bite to defend their territory, and females likewise defend their pups.

They won’t always stand their ground though, and therein lies part of the danger to the rest of the seals in the colony. If a bull is displaced from his territory, he will then displace the next weaker male, who will then displace the next in the hierarchy, and this will continue until the numerous younger males are chased all around the beach. The results of such disturbance can be pitched battles between males, as well as chaos in the colony.

Another danger in this scenario is that a pup might become abandoned by its mother as adults flee, or crushed by fighting males. If adults are disturbed too much, they may not return to the same place in following years. People are asked not to approach any seal on the beach too closely and to mind seasonal beach closure signs.

Much of this information was taken from an article I wrote in May, 2009

Posted in Anatomy of a photo, elephant seals, ethics, How To, marine life, nature photography, photography, wildlife photography | Tagged , , , , , , , | 1 Comment

Anatomy of a photo #24: Dog’s Eye


Eye of the dog

One of my favorite ways to take a picture of an animal (as long as I am close enough) is to zoom in on a particular characteristic, and them take the photograph with a shallow depth of field.

That is what I did here with my friend’s dog. I zoomed in tight on a single eye. Also fun are noses, tongues, and paws.

Being zoomed in the depth of field is generally fairly shallow, but if you can control the aperture, open it up wide so that all of the attention is focused where you want it.

Happy shooting

Posted in Anatomy of a photo, How To, photography, portraits, SLR | Tagged , , , , , , , , , , , , , | Leave a comment

Anatomy of a photo #21: Great Blue Heron


Great Blue Heron in mating plumage

I noticed I somehow missed entry #21, so I am heading back in my posting numbers a little.

I was hiking in one of my local state parks (I won’t name which one, as it is nearly undiscovered, and I would like to keep it that way), when across a lagoon I saw this heron perched in a tree. I knew the area it was perched in rather well, and I thought my chances were very good of being able to approach it completely undercover, so I set off, looping around the intervening waters to approach it through the trees.

It was very dark under the trees, hiding me even better than I had hoped, so quietly and slowly I crept along, looking for an opening that I could photograph the great blue heron (Ardea herodius) from. I found a hole in the tree and grabbed a couple quick shots before creeping even closer and climbing part way up into the branches of a nearby oak.

I kept to the shadows and darker areas, trying not to expose myself to the heron’s sight as I swayed slightly, wrapping an arm around the oak as I also tried holding the camera steady. I watched as the wind stirred its dangling, pointy neck plumage, trying to time it to where they were puffed in the wind.

I was never able to keep all of the lower, blurred out foliage of the tree I was hiding in from the frames’ of the images, but I am still happy with the images, as the blurred out parts sort of blend into the foliage of the tree that the heron is perched in.

I used a 70-200mm lens with a 1.4x converter to boost me up to 280mm. My shutter speed was low- 1/160th of a second, as I was using a camera that was noisy at the higher ISOs and I wanted a fairly noise free image. The aperture was f8 to keep the depth of field fairly shallow, but not too shallow. The grey skies are part of what determined all of the settings, but they are also responsible for the even lighting.

Enjoy

Posted in Anatomy of a photo, birds, California, How To, How To, nature photography, photography, portraits, SLR, wildlife photography | Tagged , , , , , , , , , , , , , , | 2 Comments

Anatomy of a Photo #23: The bobcat marks its territory


The bobcat felt it was necessary to claim the beach as its own after it passed me

And later it sat on a bluff above me, but rather relaxed

I sat there, photographing this bobcat as it sauntered down the beach. I saw it stiffen slightly as it saw me, but it barely paused, as it kept on towards me.

As it walked down the shore, I took many pictures, rotating my camera to a horizontal orientation once that became the better composition.

It passed within two or three feet of the nose of my kayak where it was nestled on the rocks, before winding it’s way between the skeletal branches of a fallen tree. I took a few photographs of its rear and and its bobbed tail as it continued steadily on it’s way.

I was vibrant, ecstatic. This was the closest I had ever been to a bobcat, and I knew that many of my pictures would be true keepers. I was just about to put my camera down and make myself remember to breath, when the bobcat let me know what it truly thought of me…

It pointed its tail toward some of the brush, looked at me, raised his tail (yes, this action definitively told me that it was male) and sprayed. This was his beach, and I had better remember it. His territory was marked.

Later that day I came across the same cat. It sat on a bluff and watched me nonchalantly, yawning and resting its eyes. It knew who was boss.

Encounters such as this are what inspire my love of kayak photography, and keep me heading out on paddles even when I am tired and don’t have the energy. After something like this, I am floating two feet above my kayak.

Very relaxed

Posted in Anatomy of a photo, bobcats, kayak photography, marine life, My favorite Parks, nature photography, Photo Essay, photography, wildlife photography | Tagged , , , , , , , | Leave a comment

Anatomy of a photo #22: Bobcat stalking the shores of Tomales Bay


Bobcat walking towards me

This image was in a recent photo essay that I posted, and due to its popularity, I am going to write a little about what went into capturing this image.

First of all this photo was taken from my kayak. The majority of my more memorable bobcat images were taken during my kayak photography outings. Bobcats have learned to be suspicious or spooky about people who are walking around. Too often in the past they have been carrying guns or other forms of death. Take away those two legs however, and we present ourselves as a different creature. While wildcats will still become nervous around a person in a kayak and disappear, it doesn’t happen as quickly. There isn’t that same programmed response. I have heard similar things from bicyclists and horseback riders- they rarely get the same fear response from bobcats when mounted as when afoot. A second plus for the kayak is that they are cats, and cats are curious. Bobcats will often pause, wondering what the heck that thing floating out there is.

For this particular bobcat, it had felt like a bobcat sort of day, so I had actually gone out kayaking with the expectation of possibly seeing one on the shores of the bay. I saw this one while I was crossing, and still fairly far out from shore. I watched it as it stalked down the beach and rocky shore. On the hopes that it would continue its way down the shore I paddled ahead and out of sight, resting the nose of my kayak on the rocks at the very edge of the water and settled in to wait (staying in my kayak). By resting my kayak on the shore I hoped I would not have to do large paddling movements that might spook the cat. I was however worried that it would place me too much in its path, possibly stressing it out unduly from its normal behavior.

As I sat there debating with my self, I remained very still (although I had taken a couple of test shots to make sure of my cameras exposure). I had my camera at the ready, inches from my eye so that I could begin shooting with very little movement once the kitty came into view. I knew that it would notice me at some point, but I wanted to minimize the chances, and delay the inevitable. I had just decided that I might be too closely in the cat’s path and was about to push out into the water, when it came into view and it was too late. I had to stay put.

I had many horizontal (landscape orientation) photographs of bobcats already, so the first thing I did was to rotate my camera so that I was taking images in a vertical (portrait) orientation. It also seemed like a nice composition, complementing the perspective of the bobcat stalking towards me down the shore.

It was deep shadow where we were, so I did not have to worry about losing detail in highlight or shadow. It would be nice even lighting. Flashes were out of the question, as they can really disturb most wild mammals (birds not quite as much). I had a long lens on the camera (420 mm) so I had made all my camera adjustments to give me a fast shutter speed- the highest ISO I could use without having lots of noise, and a very wide aperture of f5.7 This also resulted in giving me a very shallow depth of field (which I rather enjoy for these nature portraits).

I took many images of the bobcat, as I often do when photographing wildlife. It’s easy to lose many images to blurriness (especially when shooting hand held) and also because the scene is usually dynamic and changing each instant.

This post and it’s story is getting rather long, so I will continue it tomorrow, but with another picture of the same bobcat, but one that I haven’t shared before.

Enjoy

Posted in Anatomy of a photo, bobcats, kayak photography, nature photography, photography, wildlife photography | Tagged , , , , , , | Leave a comment

Birds of Tomales Bay: The Common Loon: A video


The Common Loon. I see these birds often, as I kayak along Tomales Bay and the Point Reyes National Seashore, and I am always sure to tell them, “There’s nothing common about you.” They are a fun bird to watch as they dive and catch crabs or fish. Even more fun is certain times of the year when their wavering calls carry over the water… This wasn’t one of those times.

The loon that I filmed was grooming itself as it floated on the waters of Tomales Bay, just south of Pelican Point. It seems a fairly thorough process, as you will see from the footage. Very fun to watch. I have additional footage, but this single clip seemed to tell a nice story in itself.

Enjoy

For those that want more technical stuff, this was all shot from my kayak and hand held using a digital SLR with video capabilities. A 300mm lens with built in image stabilization was used to help steady the image as I was shooting. The sound is through the built in microphone. For further examples of kayak videography and kayak photography, search through the category bar at the right hand side of the screen.

Posted in birds, kayak photography, loons, marine life, SLR, video, wildlife photography | Tagged , , , , , , , , , | Leave a comment

The Eureka Sand Dunes: An essay in photos


This slideshow requires JavaScript.

I sat out in the dunes each morning, waiting for the sun to rise

It used to be that my friends and I would head down to the Eureka Sand Dunes (found in the Death Valley National Park) every year for a few days to a week. Amazing place. Tallest sand dunes in California, with over 800 feet from top to bottom. Several endemic species of plant. Night skies filled with bats… Fighter jets tearing through narrow canyons on training runs. Coyotes howling in the night and early mornings…

The dunes are all about perspectives, angles, and light

It’s been a few years now since we’ve been, and as I sit here looking at the pictures it makes me hunger to return, although I will probably wait until February or March, when it is a little cooler and there are the chances to see wild flowers.

For some tips on taking pictures of wind wrinkled dunes, you can visit this post- Anatomy of a Photo #39

Posted in birds, California, documentary, landscapes, My favorite Parks, National Park, nature photography, Photo Essay, photography, ruminating, SLR, weather, wildlife photography | Tagged , , , , , , , , , , , , , , | 2 Comments

Anatomy of a photo #20: Portrait of a sheep


Sometimes blurred out sheep can say more than if they were tack sharp, especially with a sharp image for contrast

I was originally taking pictures of the sheep that are blurred out in the background, when this wooly lawn mower came munching by. I quickly changed my focus, realizing that this nearby sheep would also make a nice image, especially with the others blurred into suggestions of sheep.

I had actually been driving around the different ranches on this day, looking for sheep or other interesting things to photograph in the nice light. When I saw sveral sheep with lambs grazing and relaxing in this field I pulled my truck over to a safe spot, and then snuck back to take some photos.

I made sure to take this picture before the ewe blocked out the others in back, or its face was on the wrong side of them. Having the subject facing towards the unfocused sheep and lambs helps with the photo’s flow. It helps to balance the picture. I also didn’t want to include much more than just the head of the main sheep. There wasn’t any need for other body parts to tell us who this animal is.

The lighting was also ideal for these pictures. It was late afternoon, almost evening, so the sunlight is coming in from a low angle. Notice the face is nicely lit, but even the backs of the ears are already in shadow. The animals in the background all have sun on the left side, shadow on the right. If this was the middle of the day all of the light would be coming from straight above, a much less dramatic light, but also the shadows would be distracting in a bad way.

The other nice thing about this late afternoon sun is the warm tones it creates. Mornings and evenings will often give the richest and warmest light. By the time afternoon rolls around, the light can become much harsher. Durning the winter months that those warmer color tones can last for more hours of the day (the sun is naturally lower in the sky for more of the day).

The angle I took the photograph from also adds to its appeal. The camera was at the same level as the sheep’s face and of the family in the back. I could have done this by laying down in the grass, but sheep can be a little skittish, especially when they have lambs. They are nice enough, but if they aren’t around people regularly they can get nervous easily. The road actually cut through a small hillside  a few feet below ground level, where these sheep were relaxing. I was crouched behind this cut, peering over the verge… pretty much I was stalking the sheep.

The blurred effect was created by using a telephoto lens with a wide open aperture (i.e. a smallish aperture number). The aperture wasn’t too wide though, as I wanted the subjects face to be fully in focus. The exposure was manual, but I largely followed the built in light meters recommendation. Since I could rest the camera on the ground and didn’t have to worry so much about camera shake, I shot fairly slowly for the lens I was using- 1/160th of a second.

Enjoy

Posted in Anatomy of a photo, How To, photography, portraits, road side, ruminating, SLR | Tagged , , , , , , , , , , , , , , , , | Leave a comment

Anatomy of a photo #19: Spider on a bedewed web


Spider on a bedewed web


I took this image early one morning (I feel like I start so many of these “Anatomy of a photos” with those same words) while I was out chasing that early light. The grass was still wet, and so as it turns out were the spider webs.

Every year as the fall starts rolling around (usually a month or two before halloween) spiders begin to appear on larger and larger webs out in the coastal prairies with their scrub bushes and their tall grasses. They also begin to appear more and more in the plants of gardens and farms. As the webs get bigger and bigger, so too do the spiders. It’s a fun process to see, and nearly as regular as clock work.

On this morning, I did not head out to look for spiders. It wasn’t until a couple of years later that I noticed that they always seem to follow this fall pattern. No, I was simply out for a hike to see what I and my camera would come across, and this spider happened to be part of what we came across.

Now a disclosure. I’ve manipulated this image. I rotated it so that the spider looks like it is standing on top of the web. It was actually hanging on the side of a web that was at a  slight angle ( you can tell it’s a slight angle, because the spider looks like it’s raising the web up with its feet- actually, gravity is making the web bulge out a little, where the spider is hanging from it).

Too take this picture I had to get down on my knees, hunch down low so that I was looking at the spider from the side. I didn’t start off from the side though. I began taking photographs of the spider from a more perpendicular angle, which I feel is the more classic view of a spider… and a little more boring. So I began experimenting with these side shots, which I must say I rather enjoy the effect of.

This is a macro picture. Sort of. Some of my lenses have what they call a macro function, and while it is not a true macro, it does a fairly good job of it. Many smaller digital cameras have a similar function (read your camera manual, you might find that you have one in your point and shoot also). I will actually often use my small point and shoot to make macro images, because its function allows me to get in closer than my lenses with the macro function will. This was before I had that smaller camera.

The day was still fairly dark, and it was foggy. This forced me to use a fairly open aperture, but that is good, because I rather like the effect, with the narrow depth of field. (Sometimes you choose your depth of field, sometimes it is thrust upon you as you balance shutter speed and ISO.) I kept the ISO low to keep the noise levels down in the camera. Shutter speed was fairly fast, as I was hand holding the camera- the odd angles I was crawling around at would have made it tricky to use a tripod.

And that’s pretty much it. Enjoy.

Posted in Anatomy of a photo, How To, nature photography, photography, portraits, SLR, wildlife photography | Tagged , , , , , , , , , , , , , , | Leave a comment

Anatomy of a photo #18: Boat and fog


I exposed more for the sky and the water than the other objects in the image

Early morning light is some of the best, but living out here on the edge of a continent, we sometimes have what we call “fog.” I’ve found that there are times when “fog” can create a late or second “magic hour” (the grail of so many photographers).

It still needs to be morning or evening, but there are times when as the fog swallows up the sun, and filters only some of it through, that the sky and landscape can once again get those warm colors. The visions can be especially nice if you are near water on a calm day, as I was on this morning when I was driving down Tomales Bay.

It was nearly an hour after sunrise when the fog started to break open a little. Light came filtering through, creating a rather magical waterscape. I drove quickly (with light you never know how long it will last, as it can be prone to change very quickly since the sun, clouds, mists, etc. are always in motion), to a spot where I knew there were some boats. I did not want to have the option of only photographing open expanses of water and mist, although that can also make for some very interesting shots. I wanted to be able to have options, to be able to play with my composition.

I took several shots of the boats, mists and water. Some were close ups of the boats, some showed just mist and water. This is one of the images I particularly enjoyed, largely because of the silhouette of the dock in the background.

I exposed this image more to keep the color in the sky and mists than to bring out the boat. In other images I have more boat detail. ISO speed was kept low to minimize noise. Aperture was fairly stopped down to increase my depth of field. The images were taken hand held.

Enjoy

Posted in Anatomy of a photo, How To, landscapes, photography, road side, SLR, weather | Tagged , , , , , , , , , , , , , , , , , , , | Leave a comment

Surfing under the Golden Gate Bridge: An essay in photos


I headed over to the south side of the Golden Gate Bridge early one morning and was surprised to find many people surfing. It is a rather unique spot, as the surfers head parallel to the shore, rather than just approaching a beach. Here are some of the images I gathered that day…

This slideshow requires JavaScript.

Posted in California, documentary, landscapes, Photo Essay, photography, portraits | Tagged , , , , , , , , , , , , , , , , , , , , , , | 1 Comment

Anatomy of a photo #17: Horizontal and vertical landscapes I


Look at the difference in flow between this image and the next

A simple twist of the camera, and it the photograph has a very different feel

This one is a double photo. The lesson is simple. Sometimes it can be good to rotate your camera 90 degrees, because it can give the image a very different feel. Also, when doing landscapes, especially of valleys and such from above, it can really help the flow of the image if you include some nearby objects in the foreground. It helps give the picture a sense of scale and distance.

Enjoy

Posted in Anatomy of a photo, California, How To, How To, landscapes, nature photography, photography, portraits, road side, SLR | Tagged , , , , , , , , , , , , , , , , , | Leave a comment